Pelican Installation Instructions
Parts installation
Parts installation
- A) Hub and Crank Replacement
- B) Crank Bushing Replacement
- C) Pedal Replacement
- D) Hub Blade Replacement
- E) Rudder Rod Replacement
- F) Rudder Post / Blade Replacement
- G) Rubrail Replacement
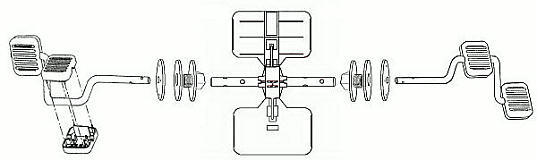
- Hub and Crank Replacement:
-
1) Having two people and being able to lean the boat against a wall will be helpful.
2) From the underneath side, use 2 - 7/16" wrenches to remove the nuts and bolts from the hub tube where the hub and crank meet.
3) From the deck side, pull on the crank to slide it out of the hub tube. You may need to spray penetrating oil into the area where the crank slides into the hub tube.
4) Pull cranks out of the crank bushing, lifting gently to get past walls of footwell.
5) Refer to procedure B for replacement of crank bushings.
Assembly
6) Slide the hub tube through the star and align the bolt holes with the slots on the star.
7) Insert the bolts through the star and tube and tighten the nuts.
8) Remove any deposits on the cranks with a scouring pad if they are not being replaced.
9) Using a cotton swab, coat the end of the crank and the inside of the crank bushing with a light coat of petroleum jelly to make assembly easier.
10) Slide the crank through the bushing and into the hub tube. Be sure the flat side of the bottom blade is facing the rear of the boat.
11) Make sure the cranks are facing opposite directions as you align the bolt holes and insert the bolts. See figure below.
12) Place nylock nuts on bolts and tighten.
13) Refer to procedure D for hub blade installation.
Back to top
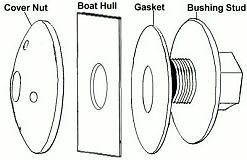
- Crank Bushing Replacement:
-
1) Refer to procedure A for removal of cranks and hub.
2) Using an adjustable wrench unscrew the bushing stud from the underside of the boat.
3) Remove cover nut from top side of boat.
Assembly
4) Place gasket on bushing stud and insert from underside of boat.
5) Thread the cover nut onto the stud from the top side of the boat.
6) Hold the cover nut using needle nose pliers or phillips screwdriver placed in the holes of the cover nut.
7) Tighten the bushing stud from the underside using an adjustable wrench.
8) Do not overtighten as this can damage the threads.
9) Refer to procedure A for installation of cranks and hub.
Back to top
- Pedal Replacement:
-
1)
Remove old pedal if present.
2)
Place 1/2 half of the pedal on each side of the crank.
3)
Line up the locking tabs.
4)
Press the 2 halves together until you hear a click sound.
Back to top
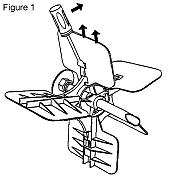
- Hub Blade Replacement:
-
1)
Remove the old blade from the hub star by inserting a flathead screwdriver as shown in Figure #1.
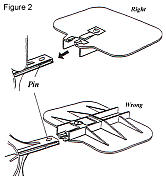
2)
Insert the new blade on the star. Note the small round locking pin as shown in Figure #2 determines the proper blade direction.
Back to top
- Rudder Rod Replacement:
-
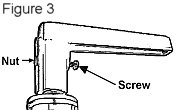
1)
Remove the bolt and nut holding the steering handle to the steering tube. See Figure #3
2)
Slide the steering tube out of the boat.
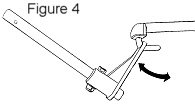
3)
Following the hook, rotate the steering elbow down and off the rudder rod. See Figure #4
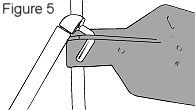
4)
Following the shape of the hook, remove the rudder rod from the rudder. See Figure #5
5)
Insert the new rudder rod into the rudder first in reverse of step 4.
6)
Insert the steering elbow onto the rudder rod and slide the steering tube back into the boat.
7)
Be sure steering elbow connection is on the same side as the rudder connection. See Figure #6
8)
Line up holes in the steering tube and steering handle and re-install the nut and bolt.

Back to top
- Rudder Post / Blade Replacement:
-
1)
If there is a collar with a set screw on the rudder post, loosen the set screw and remove the collar.
2)
If there is no collar, carefully pry the plastic cap off one end of the post or cut the post just under the lip of the cap. It will be discarded and replaced by the collar included.
3)
Slide the post out of the boat and also out of the rudder.
4)
Following the shape of the hook, remove the rudder rod from the rudder. See Figure #5 above.
5)
Insert the rudder rod into the rudder in reverse of step 4.
6)
Slide the post thru the rudder. Note the plastic cap on the post goes next to the rudder.
6)
Slide the post thru the boat and place the collar over the post. Tighten the set screw on the collar with an allen wrench.
Back to top
- Rubrail Replacement
-
1)
Carefully drill out the old rivets and remove the rubrail. Clean off any old adhesive that might be on the boat.
2)
The new rubrail must be heated to allow it to stretch and fit your boat. Carefully heat the rail to about 160° - 190° F or until it stretches easily. This can be accomplished by placing it in an oven set to 250° for 8 - 12 minutes until soft. Leave the oven door partially open with about 6-8” of the rubrail ends hanging out the oven door. This will keep the ends cooler so that they do not tear when pulling the rubrail around the boat. Wear gloves when handling the heated rubrail. CAUTION: DO NOT PLACE THE RUBRAIL TOO CLOSE TO THE OVEN HEATING ELEMENT.
3)
Start at the center stern of the boat. Drill a 3/16” hole near where the previous rivets were if you can't use the original holes in the boat flange. Secure one end of the rail with two rivets using a washer on the underneath side of the rivets.
4)
Place the rail along the boat's contour while applying a constant tension to stretch it slightly. Drill and secure the remaining end with rivets. Trim to length as necessary.
5)
NOTE: Once you take the hot rail out of the oven, move quickly to complete installation before it cools. Using two people to install the rubrail is easier.